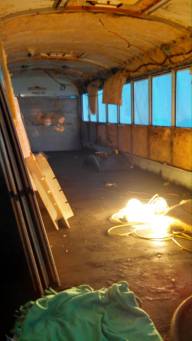
I’d started blogging about this conversion a few months after I’d started working but the most immediate steps are as follows:
1.) Finish rust prevention painting.
Tools Used: Large gauge air powered paint spray can, Air compressor, Paint brush, some basic flat black chassis saver paint, Gloves, Painters respirator, Goggles, Plastic painters drop cloth to cover the whole bus (the stuff I got was pretty thick but I planned on leaving it up for warmth so I needed it to last. Clothes you plan on ruining because you WILL ruin them using this kind of paint.
2.) Patch holes in floor.
Tools Used: Caulking Gun, 100% Silicone flashing caulking, Aluminum flashing, Tin snips
3.) Remove broken heater
Tools Used: Pipe cutter, Wrench
4.) Install flooring tar-paper, base layer plywood sub-flooring insulation and floor studs.
Tools Used: Screw Gun, Clamps, T-Square, Chop Saw, Circular Saw, Saw Horses
5.)Install radiant heating Pex tubing and additional insulation.
Tools Used: Circular Saw, Small Wood Chisel, Hammer, Chop Saw, Screw Gun, Router
6.) Finish installing sub-flooring plywood.
Tools Used: Circular Saw, Saw Horses, Screw Gun, Stud-Finder, Chalk line, Measuring Tape
7.) Weld custom Jack mounts for roof raise.
Tools Used: Mig welder, Chop saw, Plasma Cutter, Ruler, T-Square
8.) Cut roof ribs and sections that aren’t being raised, jack up roof, and weld in new C channel Iron bar-stock.
Tools Used: Oxy-fuel cutter, Grinder with multiple attachments, four 60-inch 7000 pound farm jacks, Screw gun, extra drill bits to go through all that metal, Socket wrench, Level, Measuring Tape
9.)Framing
Tools Used: Screw gun, Level, Measuring Tape
10.) Install windows/steel sheet metal in window gaps.
Tools Used: Screw Gun, Mig Welder, Rivet Gun, Air Compressor, Clamps, Oxy-Fuel Cutter
Next I’ll figure out my plumbing, propane and electrical systems in addition to adding on some under carriage storage. But that’s too far in the future to give a step by step process. If you’ve never done any kind of DIY construction, whether remodeling or starting from the ground up, just realize that the learning curves are pretty big but a little ingenuity, motivation and a with little help from our friends posting on youtube, you can get by and learn to do most things. Construction is a big challenge – it can be hard. But its not something one should be afraid of tackling. You just need to do your research and if you know someone who does know what they’re doing, go ask them! You’ll learn more easily and friends can be one of your most frugal options when trying to save money and it can be cheaper to re-purpose/reuse if going green is your thang.

Looks like a cool project…. I know it’s not an artisitic thing to do, but do you have a bread-down of the expenses incurred and the cost of tools used / rented? It would be interesting to get an actual cost of conversion.
LikeLike
Sure thing. Though the expenses incurred through tools will be a skewed number. Being a student, I have access to tools through U. of Cincinnati, DAAP so I don’t have to buy a lot of them. However some tools that I either didn’t have or decided there was a more appropriate option for, I did go buy. I’ll try to post soon.
LikeLike